


The consistent remote association, predominant sound quality, and instinctive plan make them a well-known decision for clients across the globe. If you own a Macintosh and need to encounter the opportunity of utilizing AirPods, you’re perfectly located. In this blog, we will guide you through the straightforward and hassle-free course of associating AirPods to your Macintosh, guaranteeing you can partake in your favorite music, accept calls, and participate in video calls easily.
Stage 1: Look at Similarity and Update macOS (if necessary):
Before getting everything rolling, guarantee that your Macintosh is compatible with AirPods. AirPods are viable with Macintosh models running macOS Sierra (10.12) or later renditions. On the off chance that your Macintosh’s working framework is obsolete, update it to the most recent macOS rendition from the Application Store for a smooth and improved experience.
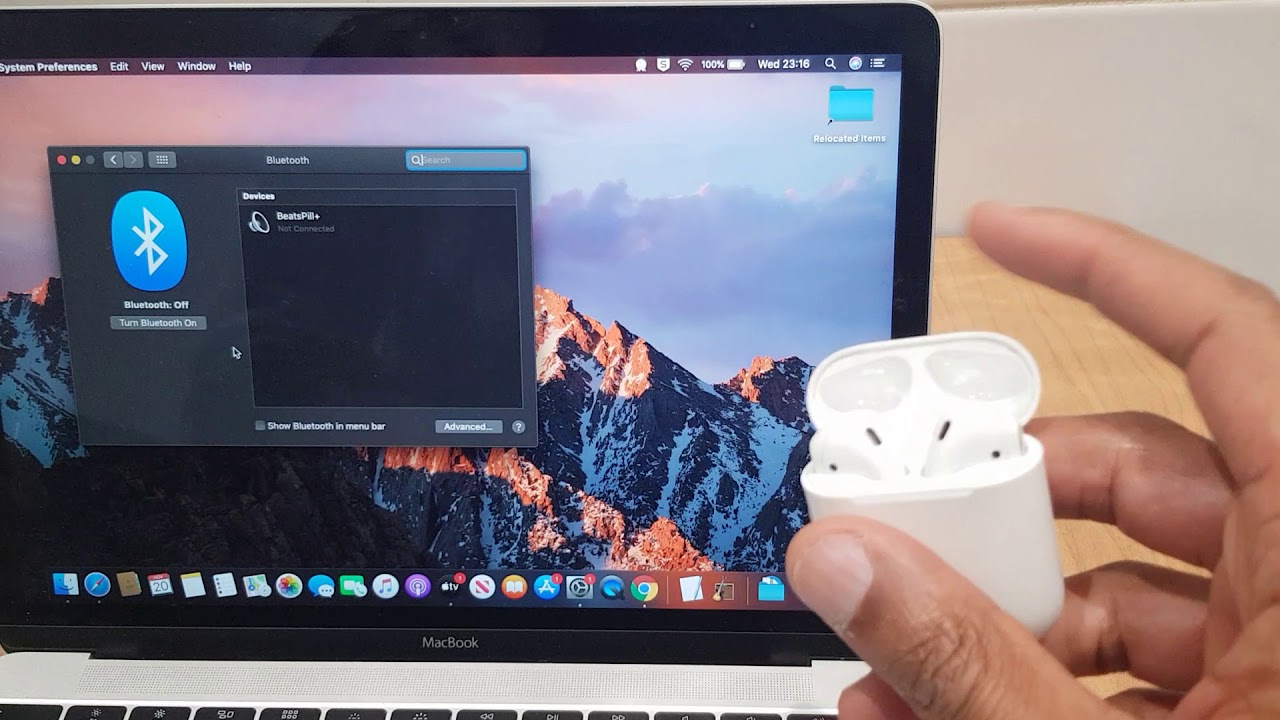
Stage 2: Empower Bluetooth on Your Macintosh
To interface your AirPods to your Macintosh, you’ll have to enable Bluetooth. Click on the Apple logo in the upper left corner of your Macintosh’s screen, go to “Framework Inclinations,” and select “Bluetooth.” Ensure the Bluetooth option is flipped on to permit your Macintosh to find nearby gadgets, including your AirPods.
Stage 3: Open the AirPods Case
Presently, open the AirPods case close to your Macintosh. The matching system will consequently start when the case is open and the AirPods are prepared to associate.
Stage 4: Associate AirPods to Your Macintosh:
When the matching system begins, you will see your AirPods’ name show up in the rundown of accessible Bluetooth gadgets on your Macintosh’s screen. Click on the AirPods’ name to lay out the association. After an effective match, you will see an affirmation message, and your AirPods will be ready to use with your Macintosh.
Stage 5: Arrange Sound Result Settings (Discretionary):
If you have any desire to change the sound result settings for your AirPods, you can do so in the “Sound” part of your Macintosh’s “Framework Inclinations.” Snap-on the Apple logo, go to “Framework Inclinations,” and select “Sound.” Under the “Result” tab, you’ll find your AirPods recorded as an accessible sound result gadget. Select them, and you can redo the sound result settings according to your inclination.
Stage 6: Consistent Exchanging Between Gadgets (iOS to macOS):
One of the benefits of AirPods is the consistent exchange between Apple gadgets connected to your iCloud account. Assuming that your AirPods are now associated with your iPhone or iPad, they will naturally change to your Macintosh when you begin utilizing them on the PC. Also, when you change back to your iOS gadget, the AirPods will consequently associate with it, making the progress easy and continuous.
Stage 7: Alter AirPods Signals (Discretionary):
AirPods accompany built-in sensors that permit you to control different capabilities with straightforward signals. For instance, two-finger tapping the AirPods can play or stop music or reply to or end calls. If you have any desire to tweak these motions as indicated by your inclinations, you can do so from your Macintosh’s “Framework Inclinations.” Go to “Bluetooth,” click on the “Choices” button close to your AirPods’ name, and select the ideal signals starting from the drop-down menu.
End:
Interfacing AirPods with your Macintosh is a direct interaction that brings remote opportunity and outstanding sound quality to your day-to-day computing experience. By following these straightforward advances, you can undoubtedly coordinate your AirPods with your Macintosh and partake in the comfort of consistent sound exchange between your Apple gadgets. Whether it’s paying attention to music, participating in video calls, or watching films, your AirPods will improve your Macintosh experience to an unheard-of degree of comfort and satisfaction. Embrace the remote universe of AirPods on your Macintosh and revel in the easy and unrivaled sound experience they offer. Blissful tuning in!


