

An iPhone’s screen recording feature can come in handy for a number of uses, such making instructional, recording gameplay, or sharing screen activity with others. This tutorial can help you get started with screen recording on your iPhone by taking you step-by-step through the entire procedure.
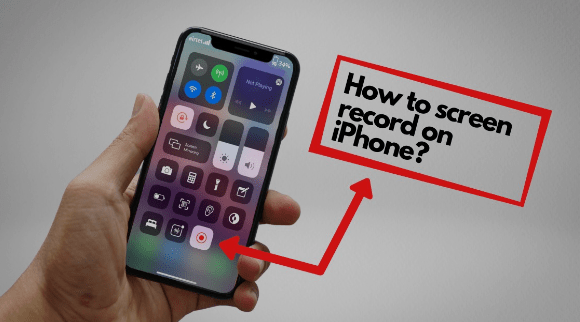
Step 1: In Control Centre, Enable Screen Recording
Making sure the screen recording feature can be accessed from your Control Centre should be your first priority. Here’s how to make it active:
- Get your iPhone’s “Settings” app open.
- After swiping down, select “Control Centre.”
- Make the choice “Customise Controls.”
- To add “Screen Recording” to your Control Centre, find it in the list and press the green plus button next to it.
Step 2: Go to the Centre of Control
It’s time to use the screen recording feature that you just added to your Control Centre:
- To access the Control Centre, swipe down from the top-right corner of the screen (on iPhone X and after) or swipe up from the bottom of the screen (on iPhone 8 and prior).
Step 3: Record the Screen
It’s simple to start the screen recording procedure when the Control Centre is open:
- The “Screen Recording” symbol can be found by locating the little circle with a dot inside of it.
- On the “Screen Recording” icon, tap.
Step 4: Adjust Preferences (Optional)
To improve your screen recording experience, you can adjust a few settings before you begin:
- 3D or long-press Tap the (depending on the model of your iPhone) “Screen Recording” icon.
- You’ll be able to record and view your microphone selections. To capture audio from your device’s microphone, toggle the microphone icon on and off.
Step 5: Recording: Begin and End
You can now start recording the screen of your iPhone:
- Press the red “Start Recording” button to begin recording. A countdown of three seconds could appear before the recording starts.
- You can end a recording by touching the red status bar at the top of the screen and choosing “Stop.”
Step 6: Listen to and Distribute Your Files
Your screen recording is stored to your Photos app whenever you finish recording. Here’s where to look for and distribute your recordings:
- On your iPhone, open the “Photos” app.
- Find the screen recording on your camera roll and select it.
- Select the share icon, which is a square with an upward pointing arrow, to distribute the recording by email, messaging, or your favourite social media network.
In conclusion, screen recording on your iPhone is an effective tool that has a variety of uses. You may quickly record and share your screen actions for troubleshooting, gaming, or instructional purposes with these easy steps. So go ahead and investigate what your iPhone’s screen recording capabilities can do!


