

You’ll find the principal piece of the Zora Defensive layer set in The Legend of Zelda: Tears of the Kingdom during the “Sidon of the Zora” primary story journey — that a solitary allows you to climb cascades similarly as in Breath of Nature. The other pieces take somewhat more work to find.

Our Tears of the Kingdom Zora shield guide will assist you with finding each of the three bits of the Zora defensive layer set: the Zora Protection, Zora Greaves, and Zora Steerage.
ZORA Protection CHEST PIECE Area
When you arrive at Zora’s Space, you’ll have the option to complete the “Slop Covered Sculpture” primary mission and begin the “Sidon of the Zora” principal journey. At the point when you meet Sidon’s life partner, Woman Yona, in the Zora’s Space clinic, she’ll say she has the Zora Protective layer for you, yet needs an old arowana to fix it. This starts the “Reestablishing the Zora Protective layer” fundamental journey.
You can source this fish either by tracking down Dento, as Yona recommends, or getting back to the Incomparable Sky Island, the two of which are framed in more detail on our antiquated arowana areas page.
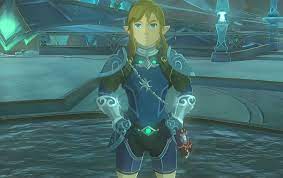
Preparing Zora Protection in the stock screen of Zelda: Tears of the Kingdom
Picture: Nintendo EPD/Nintendo by means of Polygon
The covering (the chest piece) enables you to swim up cascades.
ZORA GREAVES Area
After you complete the “Sidon of the Zora” fundamental mission, go to Zora’s Space and talk with Yona once more. She’ll need to give you the Zora Greaves as a prize for your endeavors, however she will not have the option to pinpoint where they are — simply that they’re in the Old Zora Waterworks. This starts the “A Badge of Companionship” side journey.
The Legend of Zelda: Tears of the Kingdom map showing the area of the entry to the Old Zora Waterworks and the Zora greaves area.
Realistic: Jeffrey Parkin | Sources: Nintendo EDP/Nintendo through Polygon
Go to the Old Zora Waterworks through the whirlpool in the East Supply Lake toward the east of Zora’s Space.
Drop through the opening at the lower part of the waterworks to track down a Stone Bone. You don’t need to battle it, yet it’ll drop a ton of important metal when you rout it, alongside a glowing Stone Bone heart.
The Legend of Zelda: Tears of the Kingdom Connection in the Old Zora Waterworks running beyond a cascade with a bolt highlighting a cavern behind it. The Zora greaves are in a chest in the cavern.
Picture: Nintendo EPD/Nintendo by means of Polygon
Toward the southwest of where you battle it, search for a cavern behind a cascade. You’ll track down a chest with the Zora Greaves inside up certain steps behind that cascade at (3585, 0247, – 0103).
The greaves (pants) speed up.
ZORA Steerage Area
Back in Zora’s Area, you’ll find two Zora named Khira and Chroma griping about being not able to find the Zora Rudder. Paying attention to them begins “The Endless Talk” side journey.
The Legend of Zelda: Tears of the Kingdom map showing the area of the Zora rudder on Drifting Scales Island.
Realistic: Jeffrey Parkin | Sources: Nintendo EDP/Nintendo through Polygon
The fish Khira and Chroma were discussing is certainly not a real fish, but instead a spot — explicitly the Drifting Scales Island that you visited during the “Pieces of information to the Sky” principal mission. Quick travel to Ihen-a Hallowed place and afterward paraglide east to arrive on the island.
The Legend of Zelda: Tears of the Kingdom Connection remaining on Drifting Scales Island taking a gander at the cavern concealing the Zora Rudder.
Picture: Nintendo EPD/Nintendo by means of Polygon
Travel southeast to the fish’s tail, and afterward stand along the edge on the north side. Think back up along the fish’s side to recognize a little cavern just beneath the surface. Paraglide (or move) down into it to find the chest with the Zora Steerage inside at (4094, 0529, 0586).
The rudder adds a twist assault while you’re swimming.


