


It is true to say that you are burnt out on erasing games from your PS4 library? If so, it could be an ideal opportunity to upgrade your hard drive.
A few games – we’re taking a gander at you, Red Dead Redemption 2 and Marvel’s Avengers – need around 100GB of hard drive space. Also, with just 500GB of capacity on the standard PS4, PS4 Slim, and 1TB on PS4 Pro, it doesn’t take some time before you immediately run out of the room.
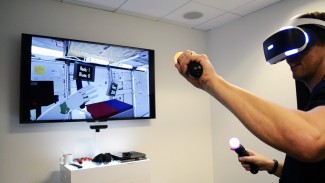
There’s another motivation behind why you might want to make the upgrade, as well, past adding extra space. When you upgrade your hard drive it is likely possible that your gaming experience will become smooth. If you have a play station, you’re probably already a gamer-head. And if you enjoy gaming, you sure want to enjoy it with the smoothest experience.
There are two ways with which you can upgrade your hard disk. You can either replace the internal drive or you can attach a new external drive. In both cases, you will get the results. However, replacing the internal drive is arguably a better option.
Before starting the process, you will have to carry out research to get yourself a new hard drive. The hard drive can depend on various things such as a super-fast performance or something that doesn’t burn a hole in your pocket. Also, make sure to make a copy of the data you don’t want to lose.
Here’s what you will need to upgrade your hard drive-
- An adjustable screwdriver
- A 2.5-inch SSD (larger than 160GB and no more than 9.5mm thick)
- Two USB flash drives
How to upgrade your PS4, PS4 Slim, and PS4 Pro hard drive
- Turn off your Playstation completely. In case you’re wondering, putting it on standby mode won’t work.
- Gently put the PlayStation on a safe surface and press down on the shiny, dark side of the top board. With the framework’s forward-looking you, slide the board leftward. It should slide directly off; no screws required.
- After you slide down the Remove the screw present at the front of your play-station.
- Later, pull out the hard docks towards you to remove the hard drive
- After pulling out the hard drive, you will discover that a metal sheet is still guarding it.
- Unscrew the screws of the metal sheet.
- Carefully position your brand new drive in the metal cage just like the old one.
- Put the screws back as they were but in the new hard drive
- Position the hard-drive cage back into the PS4’s hard drive bay
You will now have with yourself an external hard-drive with empty space. To use it later, you have will have to download the software in a standalone form that too using another computer. You will easily find the software on the Playstation website
To carry out this process, you will need a USB drive or external hard drive with sufficient space to carry the download. Easy and clear instructions are available on the website. To boot the Playstation into safe mode, press and hold the power button for seven seconds.
Later on, you can connect your controller with a USB and click on seven options to reinstall your software. Once you are through with this process you can restore the backup file you made and here you will be with a new, fast-performing upgrade.

