


Taking screen captures is simpler on iPhone or any cell phone, yet imagine a scenario in which you want to catch more than a still picture. Enter Screen Record on iPhone! There could be many justifications for why you would need to screen record on iPhone. Perhaps you need to show your gaming abilities to companions, or you need to save a video without downloading it. Maybe, you need to make a prompt aide for your YouTube channel. Independent of where your need lies, you can undoubtedly profit from the screen record highlight on iPhone. In any case, to use the advantage, you should know how to screen record on iPhone?
While you are as of nowhere, I would expect you to know nothing about this component, and hence we will stroll through two methods for assisting you with making the most out of screen recording. This is the way!
2 methods for screening records on iPhone
Screen recording on iPhone is no advanced science. It’s simply that you want to get the essentials right. Step by step instructions to screen record on iPhone will not be an inquiry on the off chance that you are familiar with the default Screen recording highlight on your iPhone.
#1 Enable iPhone’s Screen Recording highlight
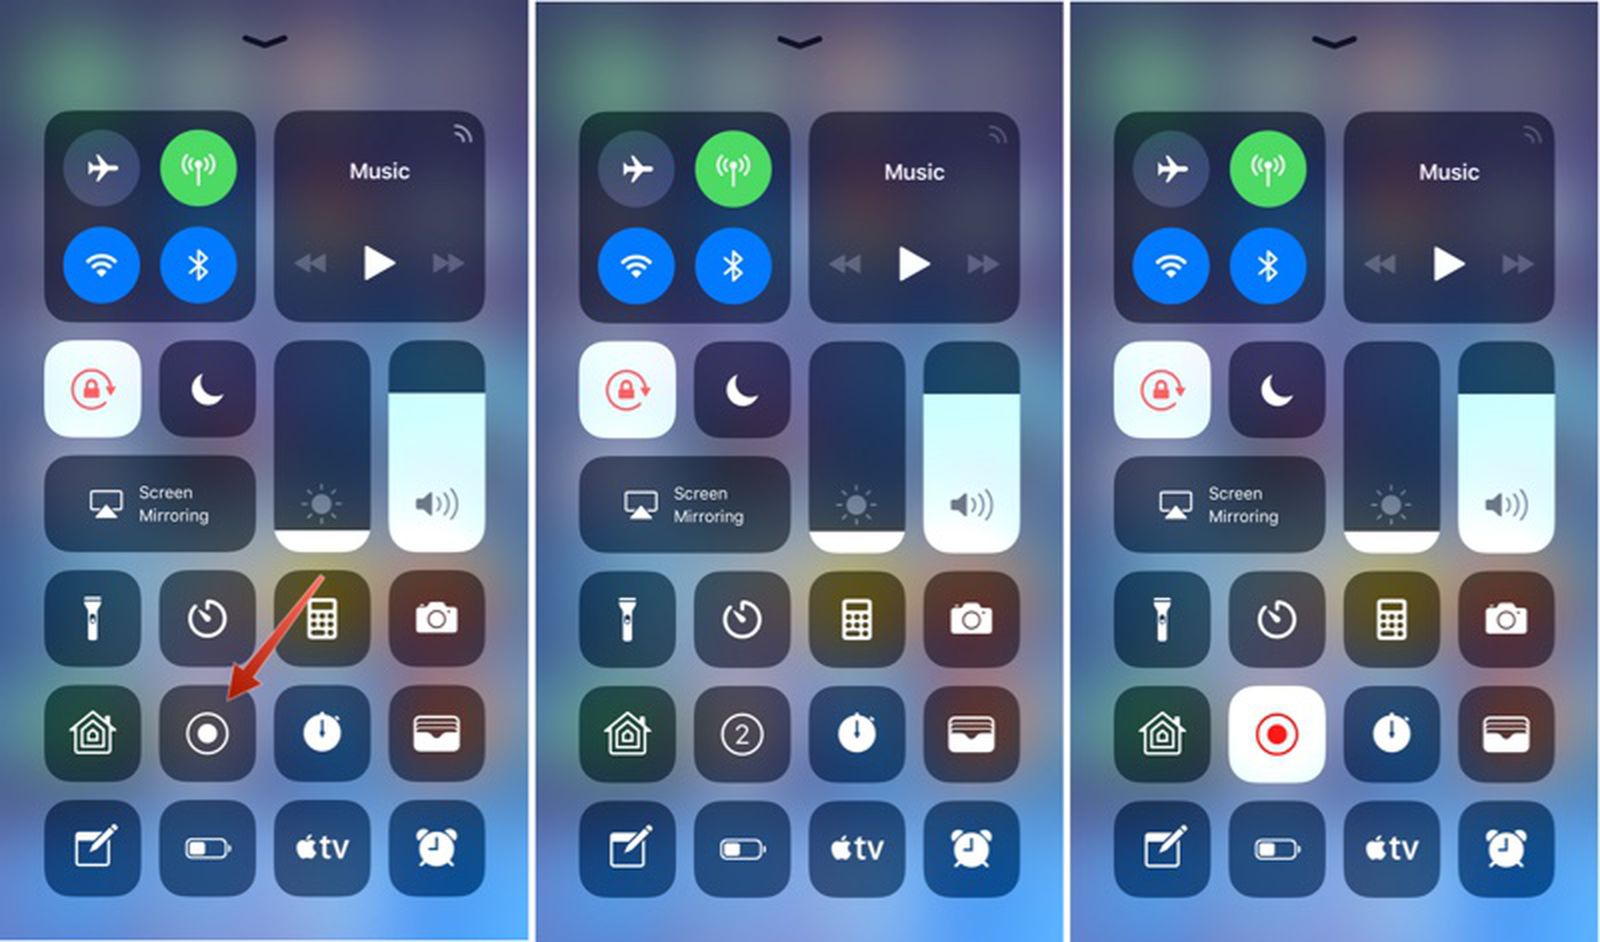
Before you start recording the screen, you ought to know how to empower this element on your iPhone. What’s more, for that, you want to check to assume the screen record button is in the Control place or not; if not, you should add it first.
- On the home screen, swipe down from the upper right corner to open the Control Center. (If you are utilizing iPhone X or later, the control community will show up by swiping down from the upper right corner, for iPhone 8 or prior, you want to swipe up)
- Presently, observe the screen record button in the control place. It will seem to be a dab with a circle around it.
- If you can’t track down it, go to Settings>Control centre>Customize Controls.
- Look down a piece to the More controls menu and observe the Screen recording choice.
- Then, tap on the “+” image that is close to the Screen recording text. Doing such, this element will get added to the Control community.
Note that you can eliminate screen recording whenever you need to by tapping on the “- ” button that shows up close to the Screen keep choice in the Control place.
Step by step instructions to do screen recording on iPhone
Since you have added the screen recording choice to the Control community, now is the ideal time to begin utilizing it. This is the way to screen record on iPhone:
- Contingent on your iPhone model, swipe down or up to open the Control place.
- Then, tap the Record button.
- A three-second commencement will begin, and from that point forward, the clock in the upper-left corner will seem red. In more seasoned iPhone models, a red bar shows up at the highest point of the screen.
- Presently, tap on the screen to close the control place and start recording both the video and sound.
- Assuming you wish to end the recording, simply tap on the red clock and tap on Stop. You can likewise swipe down the control community and tap on the Screen record button again to quit recording the screen.
Instructions to do screen recording on iPhone with sound
Your iPhone gives you the component to record yourself too while recording the screen, this is the way to make it happen:
- Tap and hold the Record button.
- A spring up screen will show up, there, tap on the amplifier symbol at the base and afterwards tap on Screen recording. You will again see the commencement has started.
- Presently, tap two times on the screen to leave the Control place.
- Along these lines, presently the receiver is empowered, and it will turn on each time you start screen recording. You can switch this component off whenever you need it.
#2 How to screen record on iPhone utilizing Mac
Assuming that you have a Mac, here’s some uplifting news for you. You can screen record on your iPhone with your Mac as well. QuickTime Player for macOS has been a capable device for recording screens on iPhones for along at this point. Likewise, the recording is done top-notch, which can be helpful while making introductions or guides.
- Above all else, associate your iPhone to the Mac and send off QuickTime Player.
- Presently, at the upper left corner of the screen, track down the File menu and pick New Movie Recording under it.
- A bar with the record button will show up. Click on the descending bolt close to the record button and afterwards pick your iPhone in the Camera menu that shows up. You can likewise empower the implicit receiver and pick the nature of the video under a similar segment.
- Your iPhone is presently reflected in the Mac. Tap the record button to begin recording the screen. To quit recording, just hit the record button once more and save the document in your ideal area.
What in the wake of recording the screen?
Since it has become so undeniably obvious how to screen record on iPhone, you could consider what’s straightaway. Indeed, you can alter and share those documents without any problem. iPhone has a ton of altering apparatuses and channel choices naturally. Make the most out of the screen recording utilizing these apparatuses.
- Open the Photos application and go to the Camera Roll. Select the recorded video.
- Presently, tap on Edit in the upper right corner.
- Then, you will track down a visual timetable of the video at the lower part of the screen. From that point, you can utilize the bolt alongside the Play button to manage the video according to your decision.
- Change the bolt till the time you are happy with the length of the video.
- You can likewise add channels to the video.
- Once done, save the altered video. Tap Done>Save as New Clip.
Furthermore, that, old buddy, is the way to do separate recording on iPhone the least difficult way. Thus, feel free to make the most out of this element.
