


Whenever you’ve completed your great alter in Adobe Premiere Pro, you want to trade the video before you can send it to your companions or transfer it to online entertainment. The point of interaction can appear to be very extreme, yet dread not! We’re here to direct you through each progression of sending out your video from Premiere Pro.
Stage 1: Open the ‘send out’ window
There are a couple of ways of doing this, yet whichever strategy you pick, you want to have the grouping/course of events you need to trade chose. You can either explore File – > Export – > Media or utilize the alternate way beneath.
- PC: Ctrl + M
- Macintosh: Cmd + M
Stage 2: Adjust the commodity design
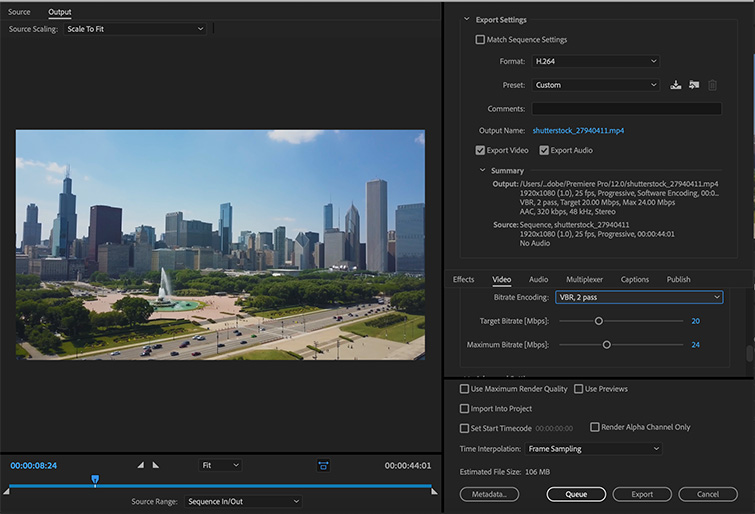
The commodity window will show a see of the video you’ve chosen to trade on the left, and an assortment of product settings to the right. There is no extreme mix of settings that works for any video, and to know which settings are ideal for you, you want to know where the video will be facilitated. For instance, best practice sends out settings for YouTube are not the same as product settings for Instagram or TikTok.
If you have any desire to remain safe and utilize an overall arrangement, H.264 is broadly utilized and acknowledged, and appropriate as a rule.
On the off chance that you realize where you will post your video, you can begin with one of the presets from Adobe. This guide won’t utilize a preset, yet rather show proposed settings for an overall product.
Stage 3: Name your document and choose where to store it
Then, you need to settle on a decent name for your video and where you maintain that Adobe should put the sent out document on your PC. This segment likewise allows you to pick if you have any desire to send out video, sound, or both. We’re sending out a video promotion to YouTube in this model, so normally, we need both video and sound.
Stage 4: Adjust your ‘fundamental video settings’
We suggest you keep a large portion of these settings matching the source settings, and if you need to make changes to things like the width or tallness, ensure you do that in your arrangement settings before you start a commodity. Additionally, make sure to flip ‘Render at Maximum Depth’ at this stage for the greatest.
Stage 5: Set your ‘video bitrate settings’
We’d recommend utilizing the Bitrate Encoding setting ‘VBR, 2 passes.’ This will take more time than the ‘VBR, 1 pass’ nevertheless will guarantee a more strong product. It additionally allows you to set an objective bitrate and a most extreme bitrate, to permit especially serious pieces of your video to put their best self forward.
Assuming that you’re in a hurry or your product isn’t the last commodity of the task, you can save a little time and utilize the ‘VBR, 1 pass’ on a low bitrate setting for a quicker send out.
For the last product, your ideal settings will contrast contingent upon where you intend to post the video. Higher objective and greatest bitrates will produce a bigger record size, and most stages will pack content when transferred.
As a rule, recordings for YouTube can utilize an objective bitrate of 15 or significantly higher with next to no issues. In any case, short-structure stages like Instagram Stories, Instagram Reels, and TikTok will pack the video more when transferred; you can sidestep a portion of that pressure by going for lower target and greatest bitrates at this stage.
Stage 6: Don’t miss the sound commodity settings
Essentially 50% of your video will be sound, so don’t miss these settings while sending it out! If you’ve soundtracked your video with music from Epidemic Sound, you can utilize the most extreme example pace of 48,000 Hz for the most elevated conceivable sound quality product.
We propose utilizing the ‘Sound Codec’ AAC, which is normal in video and real-time – it sounds better compared to MP3 per bitrate.
To augment your sound quality significantly more, you can set the bitrate to 512 kbps. A higher bitrate implies a greater product.
Stage 7: Export your video
For the last settings, we suggest you check the case ‘Utilize Maximum Render Quality.’ In this window, you get a gauge of the last document size and assuming you’ve gone through every one of the means in this aide, you’re currently prepared to hit ‘Commodity.’
Incredible work! You’ve currently dominated sending out the video in Adobe Premiere Pro.


