This guide will tell you how to make T-shirts, standard shirts, and pants in Roblox.
Purchasing Premium
Before you are able to upload your own design, you will need to have Roblox Premium. You can purchase Premium status by clicking on the Premium button from the main menu, and then selecting a plan.
Making T-shirts
Roblox offers two types of shirts: T-shirts and standard shirts. The latter can be fully customised via a template to look however you want. However, T-shirts are a solid coloured clothing option with the only customisation being an image on the front that you can choose.
- To make a T-shirt, go to Create, and then click on T-shirts.
- From there, click on Choose File and select an image that you want to use for the graphic. The optimal size for this image is 512 by 512 pixels.
- Once you have chosen your image, click on Upload, and your T-shirt is complete.
Making a standard shirt

- To make a standard shirt, go to Create, and then click on Shirts.
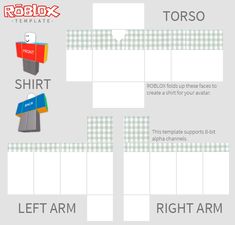
- Before you start working on your shirt, you will need the shirt template. You can get this by clicking on Download it here. From there, download the image and open it up in the image editing software of your choice. The most commonly used is Photoshop.
- On the template are sections for the torso, right arm, and left arm. Each section is divided into front, left, right, up, down, and back. Each of these sections corresponds to an area on the Roblox character. The dotted lines show the maximum limits for the height of gloves and lower leg details on R 15 models.
- To start working on your design, create a new transparent layer and begin to paint over the sections.
- Once you are satisfied with your design, you can upload it by going back to the Shirts tab Create.
- Click on Choose File, then select your shirt design.
- From there, click on Upload and your shirt is complete.
Making pants
- To make pants, go to Create and click on Pants.
- Like shirts, you will need the pants’ template before getting started.
- Click on Download it here.
- From there, open up the image in the image editing software of your choice.
- The pants are divided into the torso, right leg, and left leg sections. Just like the shirt, each section also has faces that correspond to areas on the diagram. The dotted lines show the maximum limits for the height of shoes, and for lower leg details on R 15 models.
- From here, design the pants however you desire, within the bounds set by the template.
- Once you are done, you can upload your design by going to the Pants section under Create.
- Click on Choose File, then select your pants design.
- From there, click on Upload and your pants are complete.


